Getting Started
TöltSense Online is a platform dedicated to connecting Icelandic horse riders with judges and trainers across the world. We are also developing a mobile app and sensor kit for gait training, but that is a separate project.
The platform allows you to upload videos of yourself riding FEIF Sport tests (which may be done in an arena instead of a track), enter online events, and to receive marks and comments from licensed International judges. Events may be run independently by TöltSense or in collaboration with national organisations like IHSGB. Eventually we will allow you to create your own smaller scale events such as mini shows at training weekends.
Contents
- Basics
- Sign up / Sign in
- Navigation
- Events and Classes
- Create a Horse
- Upload a Video
- Create an Entry
- Checkout and pay
- Review your entries and marks
- Tips on creating a good video
- Emails from us
- Becoming a Judge
Basics
TöltSense Online is a web application designed to work equally well on a desktop, laptop, tablet, or mobile phone. This means that you can ask a friend to film you on your phone and afterwards upload the video directly to the platform to make your entry. However, if you are a judge or otherwise providing feedback on videos, you will naturally find it much easier on a big screen.
It is possible to access the app without logging in, but if you want to enter a show or upload any content you must be a registered and logged in user. There is no charge to use the app, except for when you decide to enter a show. Terms & Conditions and Privacy Policy are available on the toltsense.com website.
Sign up / Sign in
When you visit the app and you’re not logged in you will see “Sign In / Sign up” in the top right of the menu bar (Fig. 1). Also you may see a notification at the bottom of the page with a “GO” button that will also allow you to sign in or sign up (Fig. 2).
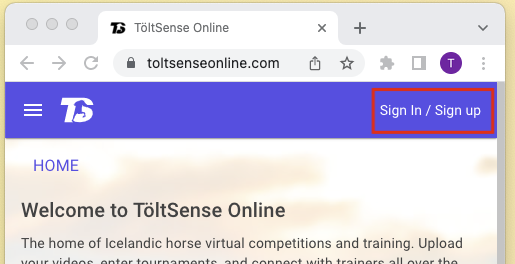 Fig. 1
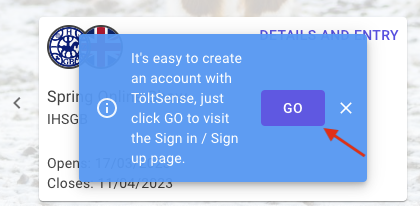 Fig. 2
Click either of these and you will be redirected to the TöltSense sign in page. If you click “Sign up now” you will get a page where you can create an account directly with TöltSense by providing a valid email address and setting a password. If you take this option you will need to verify your email by entering the code that will be sent to you.
Alternatively you can sign up using one of three social providers: Google, Apple, or Facebook. Please note that if you use Apple and choose to hide your email from us (with private relay), you may not receive notifications from us! (work in progress)
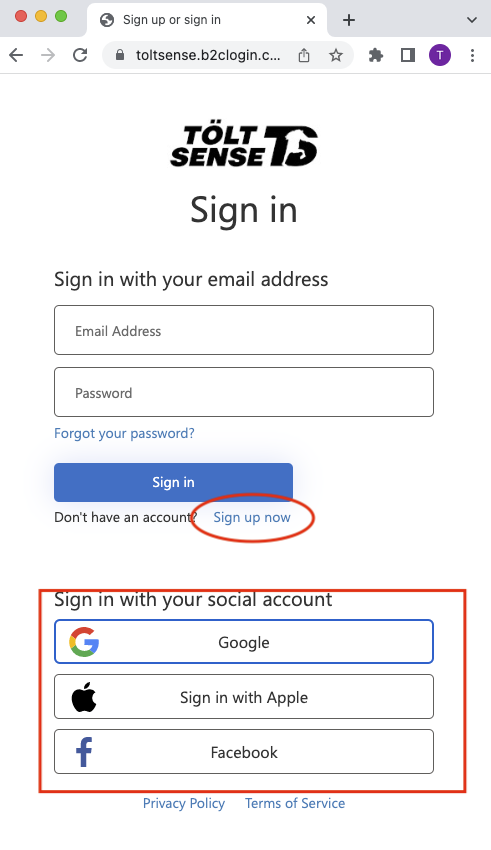 Fig. 3 - Sign in / sign up page
Once you have logged in you will see the shopping cart icon and a chip displaying your name. Both of these are clickable and will help you navigate to sign out or edit your profile, or view the cart and checkout.
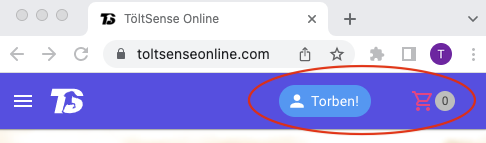 Fig. 4 - signed in with identity and cart showing
Navigation
The main navigation menu is revealed by clicking the Hamburger icon in the top left. In this screenshot below you only see a limited number of options since the user is not logged in. Further options are available once logged in.
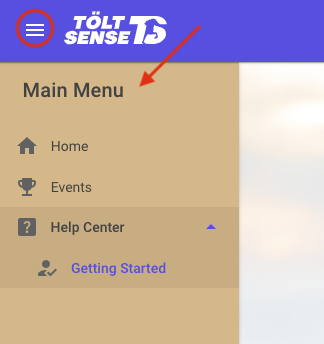 Fig. 5 - main menu
To help find your way in the app we also provide a ‘breadcrumb’ style navigation as illustrated below:
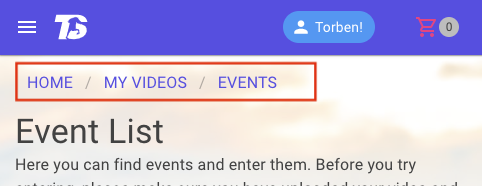 Fig. 6 - breadcrumbs
View Events and Available Classes
Forthcoming events and competitions are displayed on the home page in the “Upcoming events” carousel. However, the main way to access this information is to use the “Events” section in the main menu.
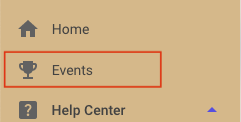 Fig. 7 - Events link
 The events list page (fig 8) shows all the events that are available in the system with main details like nationality, organising entity, and opening date. You can use the highlighted filters to choose between past, current, or upcoming events. The “Details” link on each event card will take you to a page with further information, and this is where you go to make your entry to that event.
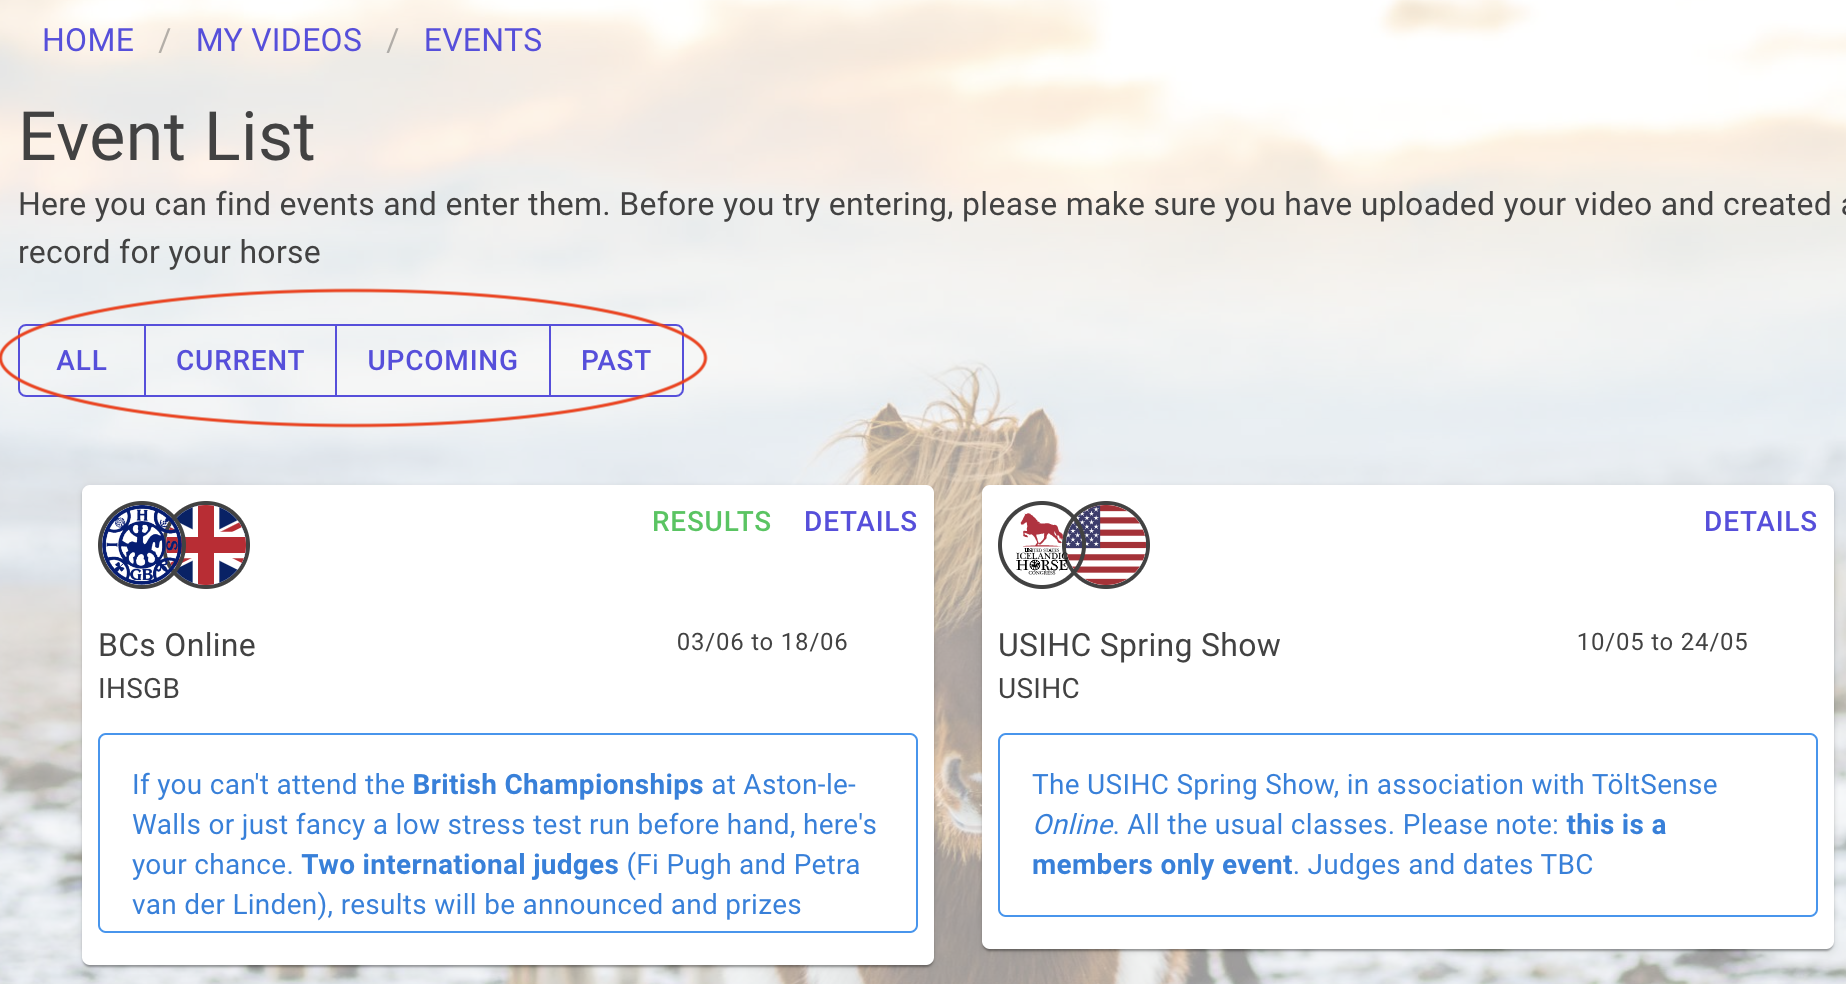 Fig. 8 - Events List
The example in fig. 9 shows the details for the “Spring Startup” show and gives expansion panels detailing the classes on offer. The “Enter” button is available when you are ready to take that step. Please note, you won’t be able to enter a show unless you are logged in, have created a horse record, and have uploaded a video.
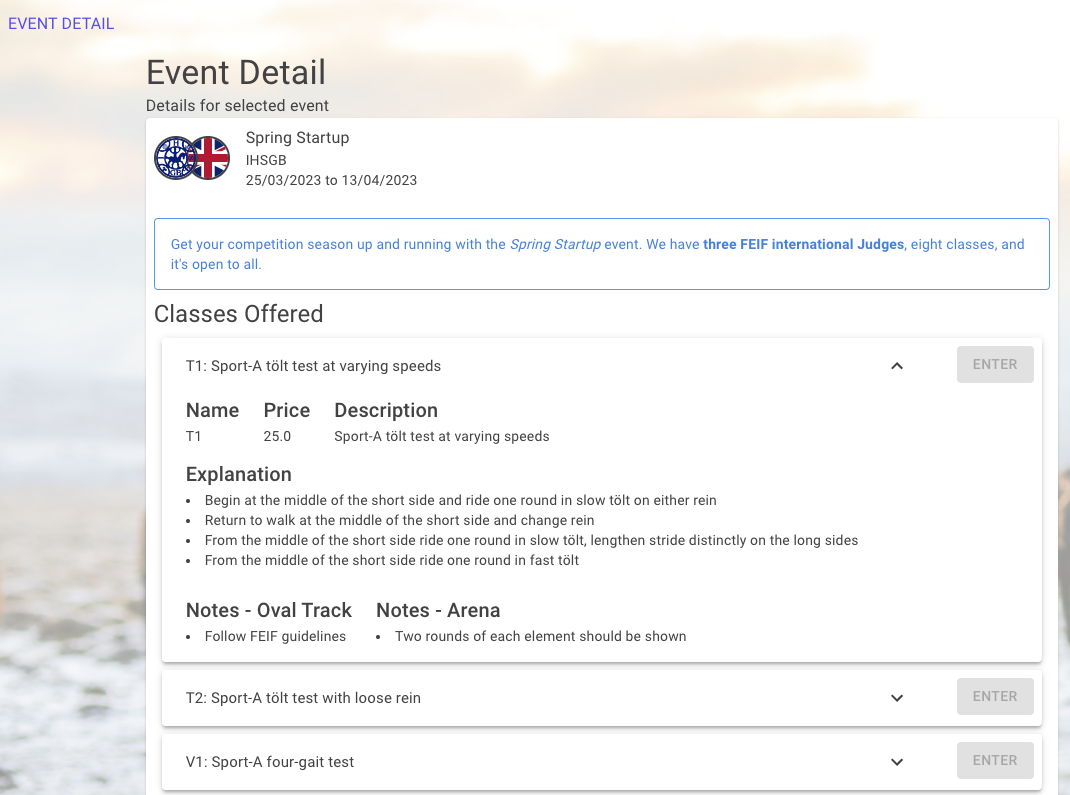 Fig. 9 - Event Detail
Create a Horse
Before you can enter any shows, you must create a horse record. Navigate to ‘My Horses’ using the main menu.
 Fig. 10 - My Horses Navigation
Then click on “Add a Horse” to bring up the “Create Horse” page.
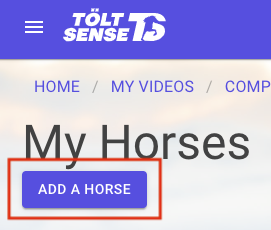 Fig. 11 - Add Horse
Here you will find a simple form where you can enter your horse’s name, FEIF ID, the gender of your horse, and any notes you may wish to make. You can also click the camera icon to set an avatar image for your horse. If you’re using a mobile you can take a new photo and set it right there and then. Gender and horse name are required fields and when you’re done, click “CREATE”.
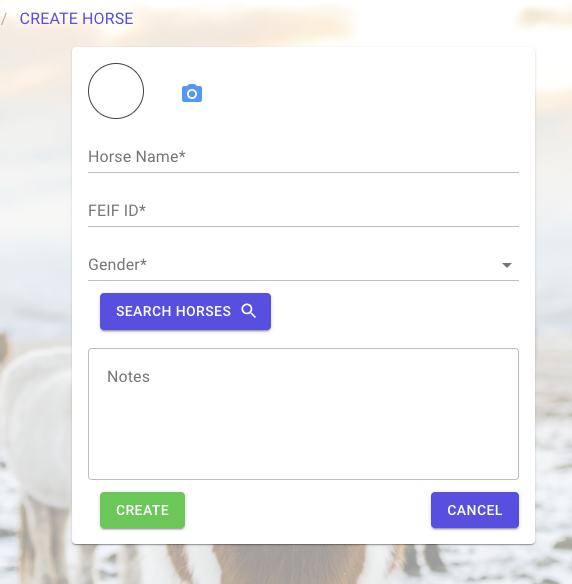 Fig. 12 - Create Horse
A convenient search function enables you to look up the details of your horse by name, farm, FEIF Id, and gender. Clicking the "Search Horses" button in Fig 12 brings up a new dialog where you can carry out this action. You do not need to enter special Icelandic characters, full name, or even a full FEIF Id. The search will bring back a maximum of 50 horses that meet your search terms. If this is your situation, then please refine your terms. Select the correct horse from the list and click "Select". The "Create Horse" form will then be populated with that data.
It is required by many event organisers that the horse details you enter are validated against the central database. TöltSense Online will therefore warn you if you have not validated your horse details but it won't prevent you from entering an event (unless the organisers have required this).
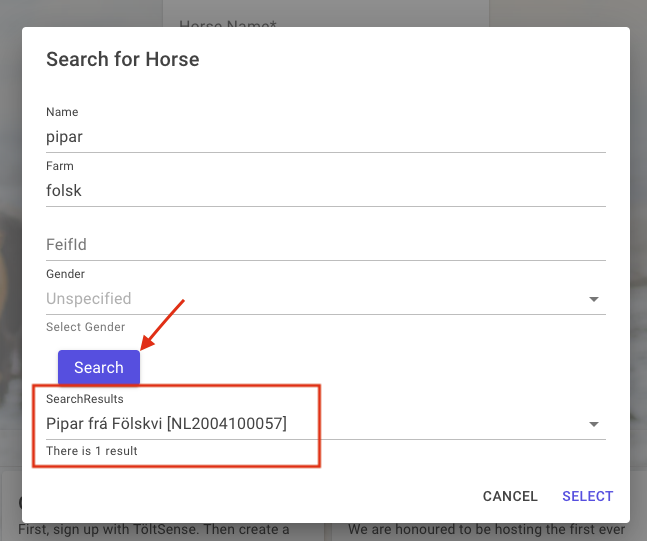 Fig. 12.1 - Search for Horse
Add to Your Video Library
Every user of TöltSense Online has their own video library. You can access this using the main menu and selecting “My Videos”.
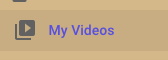 Fig. 13 - My Videos Navigation
When you enter this section for the first time it will be empty, but eventually, as you add more videos, it will look more like this (fig 14). I have highlighted the “Upload Video” button, which is what you need to click on to upload your content to the platform. It is also possible to add a video from YouTube, if you prefer hosting your content there instead. I have also highlighted the refresh icon which you can use to reload the list of videos without reloading the entire page (such as when you are waiting for a video to finish processing).
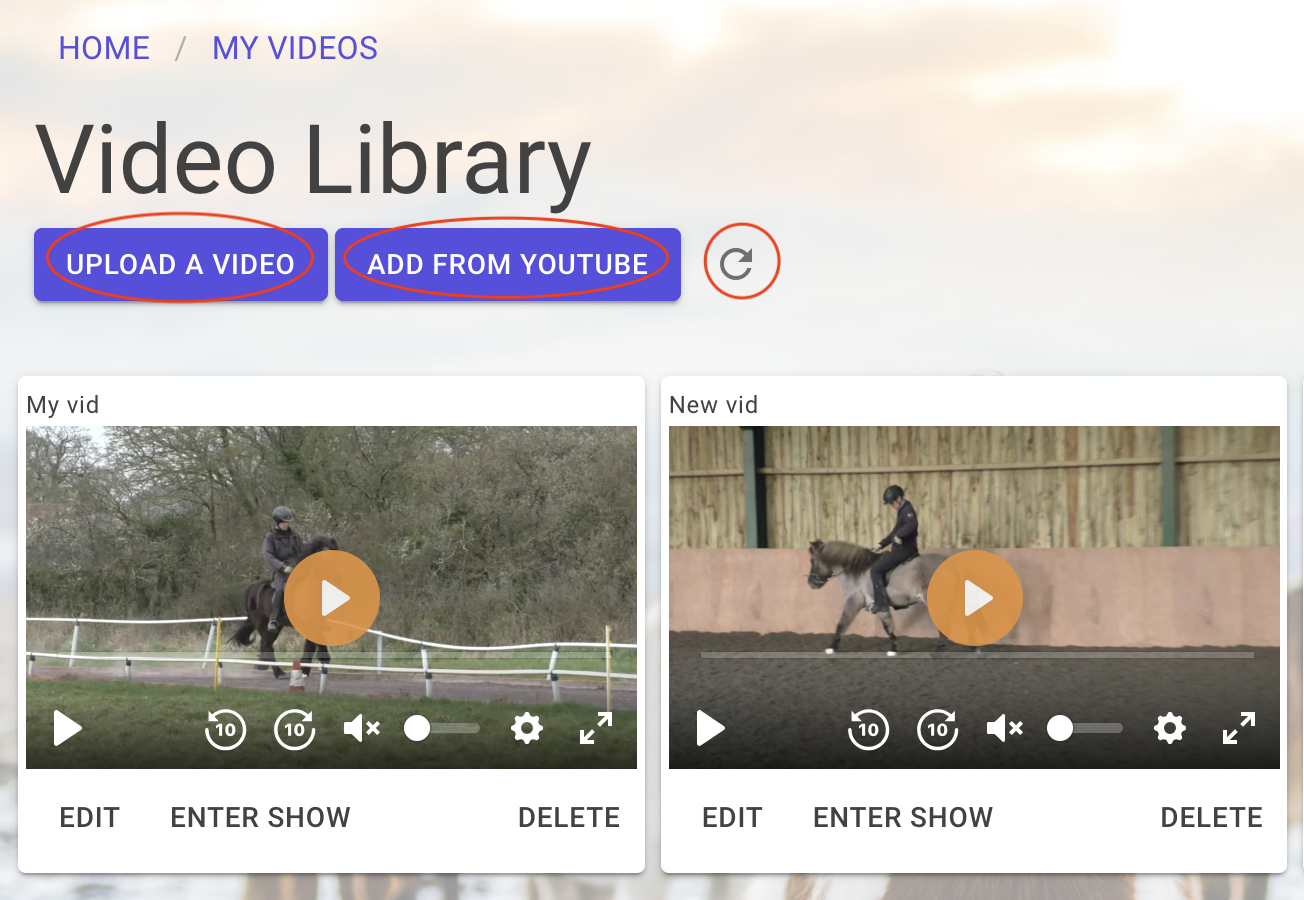 Fig. 14 - Video Library
Click the “Upload a Video” button and you will go to the upload page. There are two ways to do your upload. First you can click the “Browse” button (or anywhere in the hatched area) and the file browser for your system will appear. Second, if you’re on a desktop, you can drag and drop a file onto this section. To keep things simple, you can only upload one file at a time, video files only, and the file size is limited to 1 GB. This should be enough for any oval track test (5 or 6 minutes max) at HD quality.
Please note that videos uploaded to TöltSense Online are not publicly acessible. They will only be viewable by others when used to enter an event or if you've agreed to make the video public when making your entry.
 Fig. 15 - Video Upload
Once you have selected your file it will be displayed in the box and the upload button will become active. When you start the upload the progress bar will show you how it’s going.
 Fig. 16 - Video Upload Progress
Eventually you will get a notification that the upload has completed. The upload time is purely dependent on the speed of your internet connection so please bear this in mind. If you are uploading from a mobile phone you might want to do it over wifi rather than use up your mobile data allowance.
 Fig. 17 - Upload Success Notification
If you prefer to host your video on YouTube (maybe your video was already there or was posted by friend) then you can use the "Add From YouTube" button instead (see fig 14). Clicking here will take you to the "Video Add" page (fig 14.1) where all you need to do is paste a valid YouTube video link or Embed Code. When you click Submit you'll be asked for a video title and then it will become part of your library. Please note that to use a video from YouTube it needs to be publicly accessible.
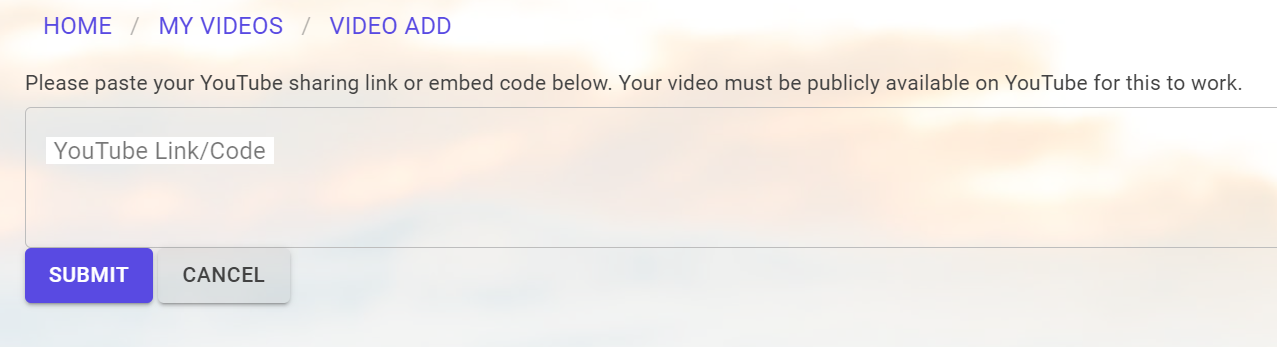 Fig. 14.1 - Add from YouTube
Once your video is ready you can use the “Edit” button to change the title of the video and enter a description, if you wish. You can also delete the video here by using the “Delete” button. Please note that you cannot delete a video that has been submitted in an entry. You will also see the “Enter Show” button, which allows you to create a show entry using the current video.
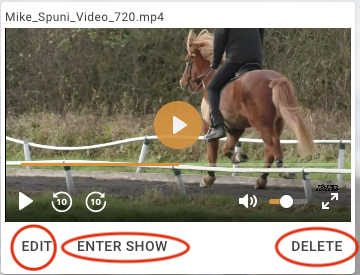 Fig. 18 - Video Card
Create an Entry
Once you have created a horse and uploaded a video, you can enter an event. An entry may be created by navigating to the Events List and Clicking “Details and Entry” (as shown earlier). If you Click the “Enter Show” button on your video you still go to the Event List, but when you actually start the entry, the video is pre-selected. Click the “Enter” button against the class you want to enter
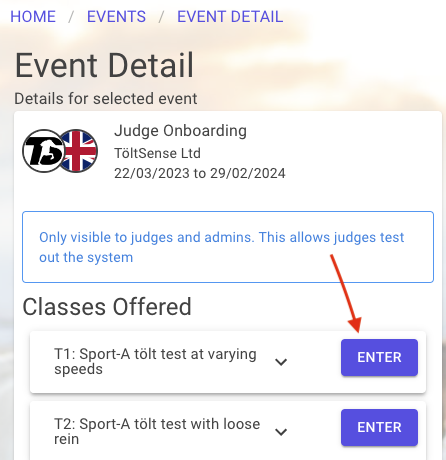 Fig. 19 - Enter Class
You are presented with the "Entry Details" form. At this point you have the chance to set the Rider Name. By default this uses the name that you used to sign up to the platform, however it possible that you might enter on behalf of another rider (e.g., a child or student) or perhaps you just wanted to edit your own name.
Next you may select the video you wish to use for you entry. If you came via the video library then your video will be pre-selected. Beneath that, you will be asked to set the video display permissions. All videos entered for an event will be viewable from the event results page when the event is completed (at the discretion of the organisers). But you are encouraged to give 'whole site' permission for your video. This means that TöltSense may display your video in a featured videos section or on the homepage. You can give or retract this permission at any time by reviewing your entry (see below).
Next, depending on the organiser's preference, you may be asked to make an 'equipment declaration' indicating that you have ensured your tack and equipment is in line with FEIF rules and regulations.
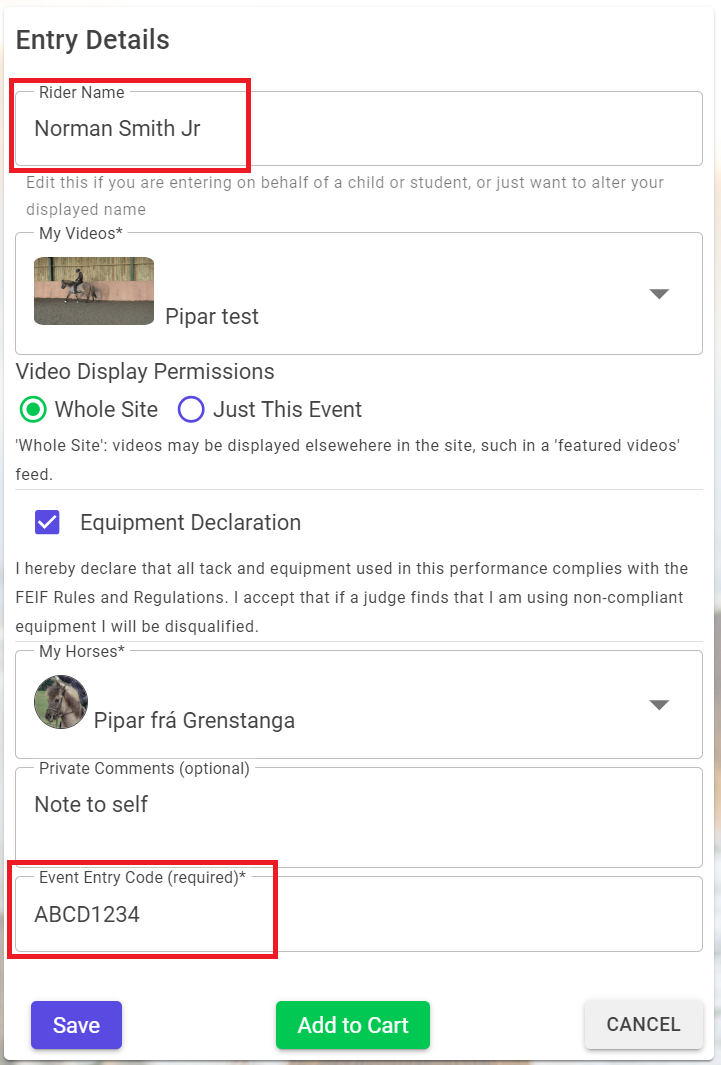 Fig. 20 - Choose Video and Horse
After setting the video, you then need to choose the right horse from 'My Horses'. There is also a field for entering any private comments that you might have about the entry. Finally, if the event you are entering is a members only one, you will need to enter a valid entry code (highlighted). These codes will be issued by the organiser and can only be used by a single user. Once you have entered and validated the code, the next time you make an entry in the same event, the code will be pre-loaded.
Once you have made your selections, you have three options. “Cancel” will exit the page without saving. “Save” will create the entry for you to come back and submit later. “Add to Cart” will progress the entry to the stage where it is ready to be paid for and submitted for judging. NB, creating an entry does not constitute entering a show, you MUST checkout and pay in order to be officially entered.
Clicking “Add to Cart” will add the entry to your cart and bring up this dialog (fig. 21).You can either “go to cart” to checkout, “make another entry”, or go to the home page. Note that the count of items in the cart has incremented to 1 (top right). Alternatively, you can also navigate to the cart by clicking the cart icon in the top right or by using the link in the main menu.
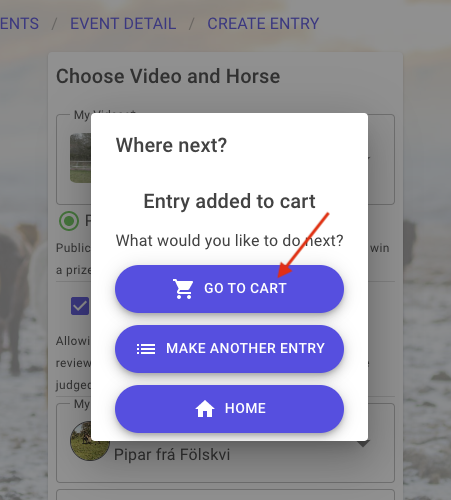 Fig, 21 - Where Next?
If you don’t add to cart immediately then later you will need to visit the Entry List (see “My Entries” in the main menu). The next screenshot shows two entries at different stages, The one on the left is new and the “Add to Cart” button is available. The one on the right is already “In Cart” and the “Remove” button is available.
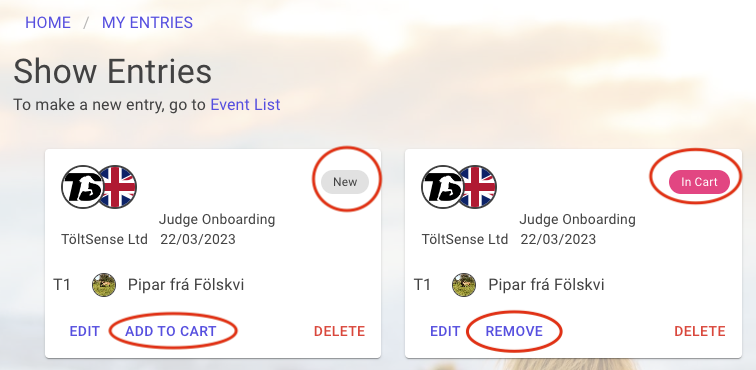 Fig. 22 - Entry List Add to Cart
Checkout and Pay
Navigate to the cart in one of the ways explained earlier (e.g., click on the cart icon) and you will see any entries that you have previously created and added to the cart. You can see a quick overview of the classes you are about to enter and if you wish, you can remove entries from the cart here. Click the “Proceed to Payment” button and you will be directed to the payment page.
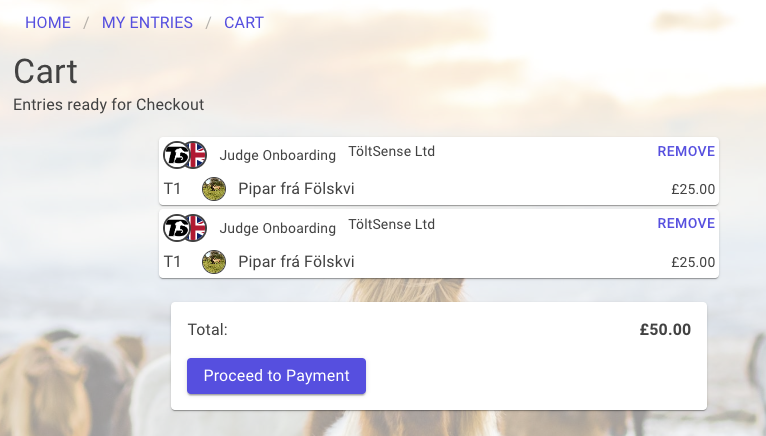 Fig. 23 - Cart
For payment we use Stripe, a globally recognised industry leader in online payments. At no point does TöltSense collect or even view your credit card information, this is entirely dealt with by Stripe. We do not take payment by cash, cheque or BACS.
The Stripe Checkout will load. You will see a summary of the items you are paying for and payment options on the other side. Depending on the device you are using you will see one or all of Google Pay, Apple Pay, or Link, and there will always be a credit / debit card payment option. In some countries there will be additional payment options.
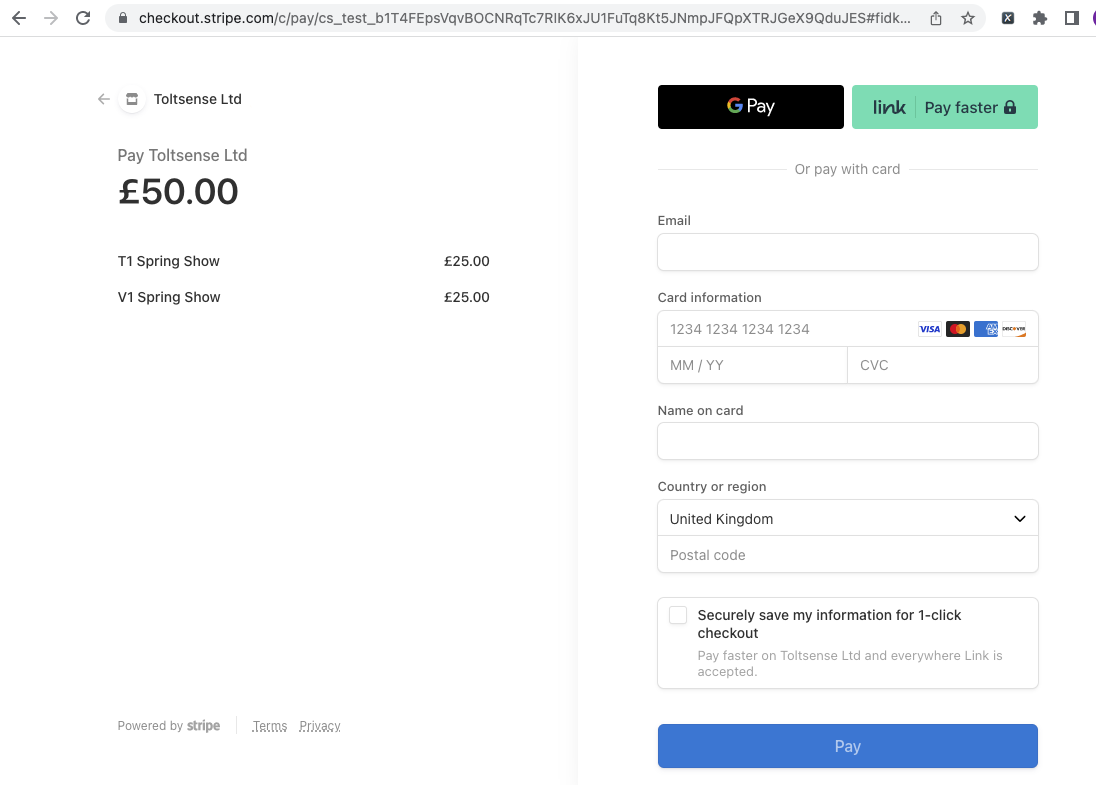 Fig. 24 - Stripe Checkout
After a successful payment you will be redirected back to TöltSense Online and to the “Payment Successful” page.
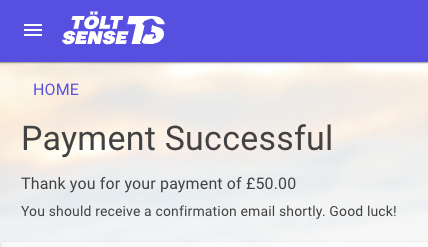 Fig. 25 - Payment Success
You should also receive two confirmation emails. One generated by Stripe (a payment receipt), and the other from TöltSense, confirming your entry has been received, like so:
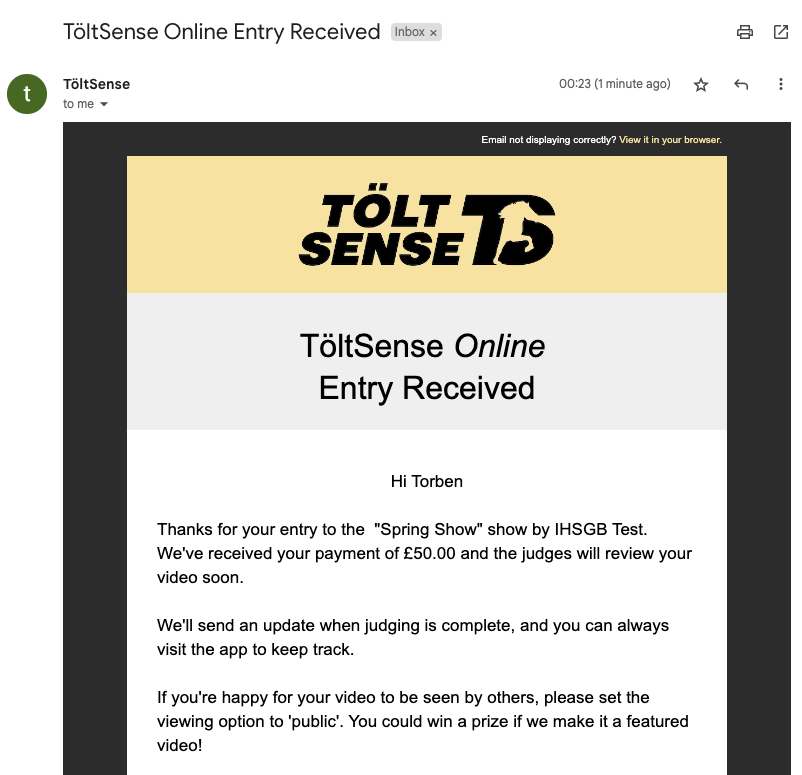 Fig. 26 - Thank-You Email
Review Your Entries and Marks
After you have completed your entry you can go back to the entry list (“My Entries” in the menu) and note that the status of the entry has changed. This screenshot (fig 27) shows three entries at different stages. From left to right, the first has been submitted and paid for and is available for review since the “Review” button is visible.
 Fig. 27 - Entries
The “Submitted” chip (arrowed) has a green dot on it to tell you something has happened. This means there are marks available to view. The second entry has also been submitted but there are no marks available yet. The third entry is at “New” status and has not been added to the cart yet.
Click on “Review” on the first entry and you will get a page where you can review the details of your entry together with any marksheets that have been completed already (fig 28). The eventual number of sheets depends on how many judges there are.
Once all the judges have returned their mark sheet for your entry, you will be notified via email that your final score is ready. We will also contact you once the event has closed and all the entries have been marked.
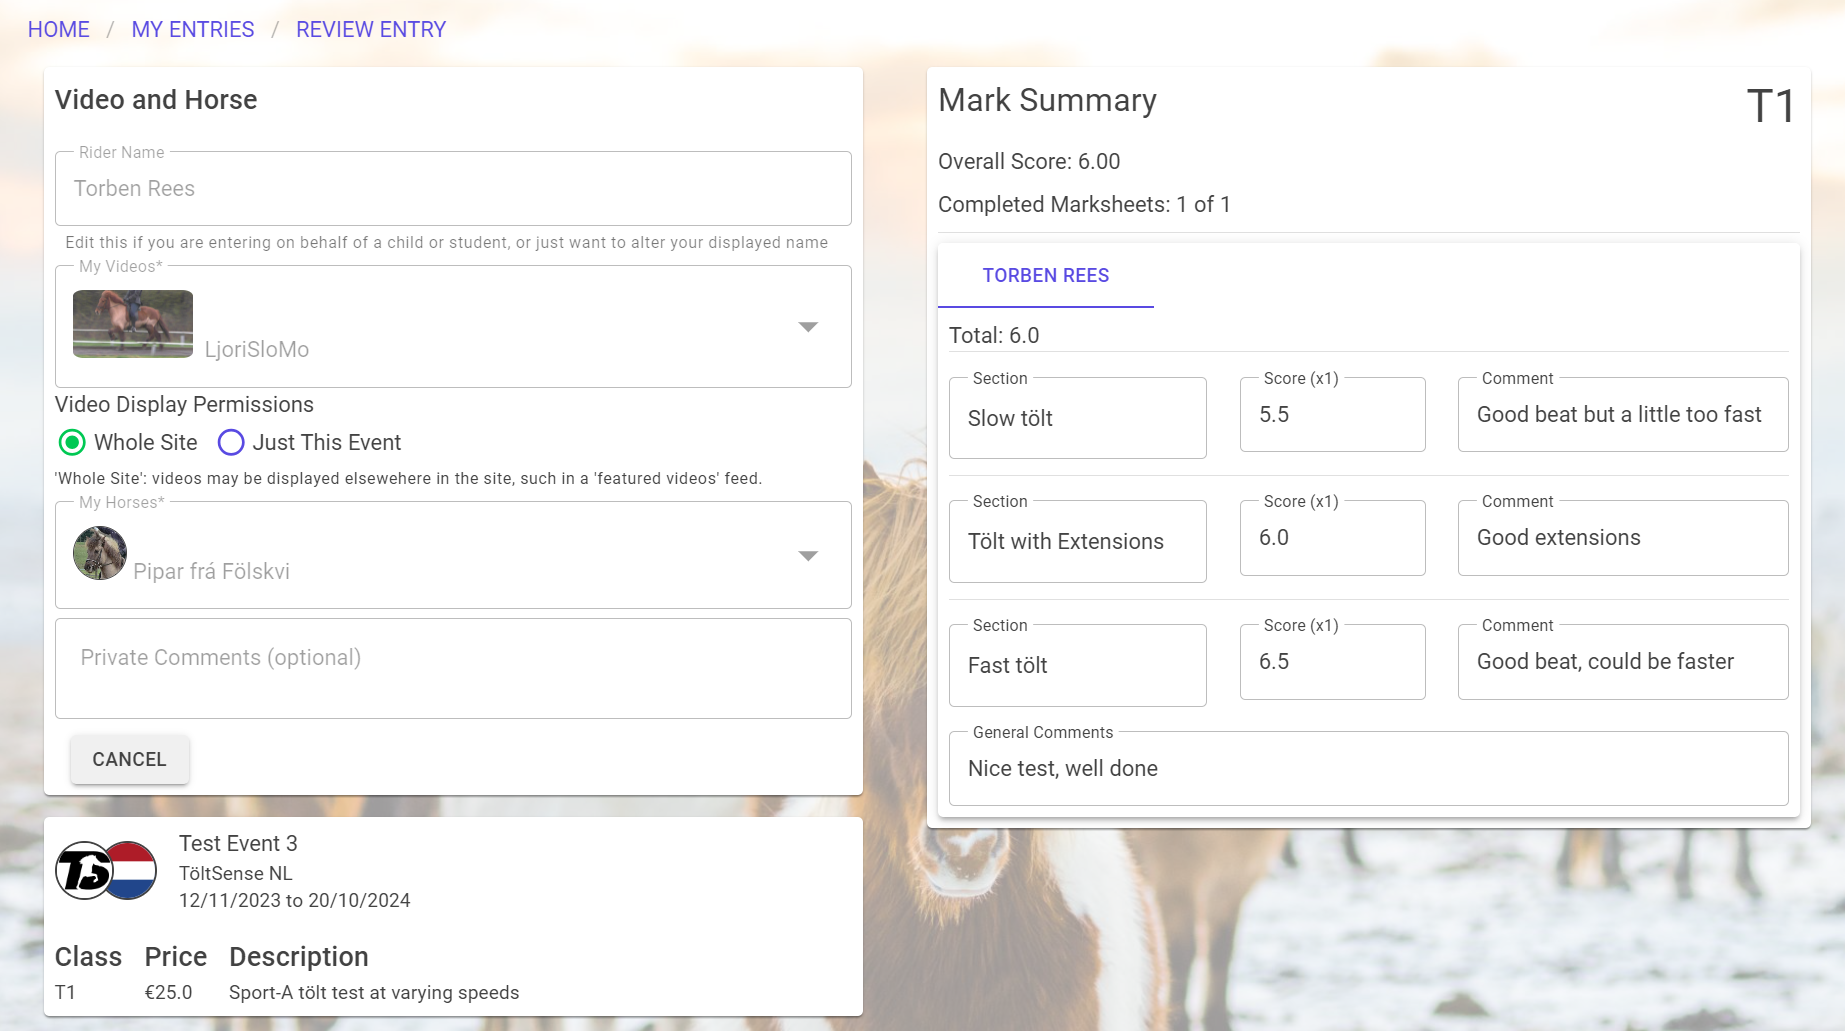 Fig. 28 - Entry Review
Event Results
Once all the entries have been marked and when the organiser decides, the results of the event will be published. Events that have been completed and where the results are published will display the results link as in fig 29.
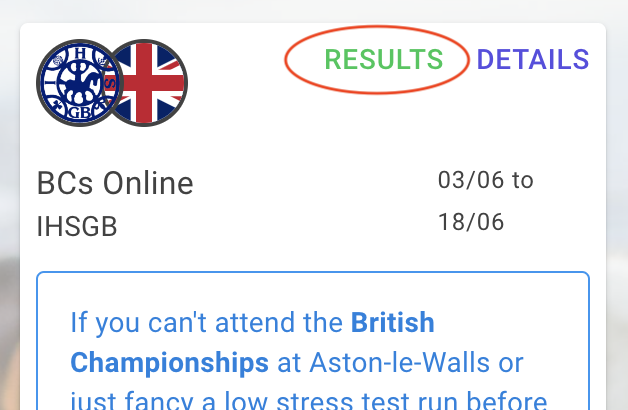 Fig. 29 - Event Results Link
The resutls are displayed in a page like fig 30. It is possible to drill into each result and view the individual section marks, as well as to view the videos. Please note, to see videos you must be logged in and the organiser must have set the videos to viewable.
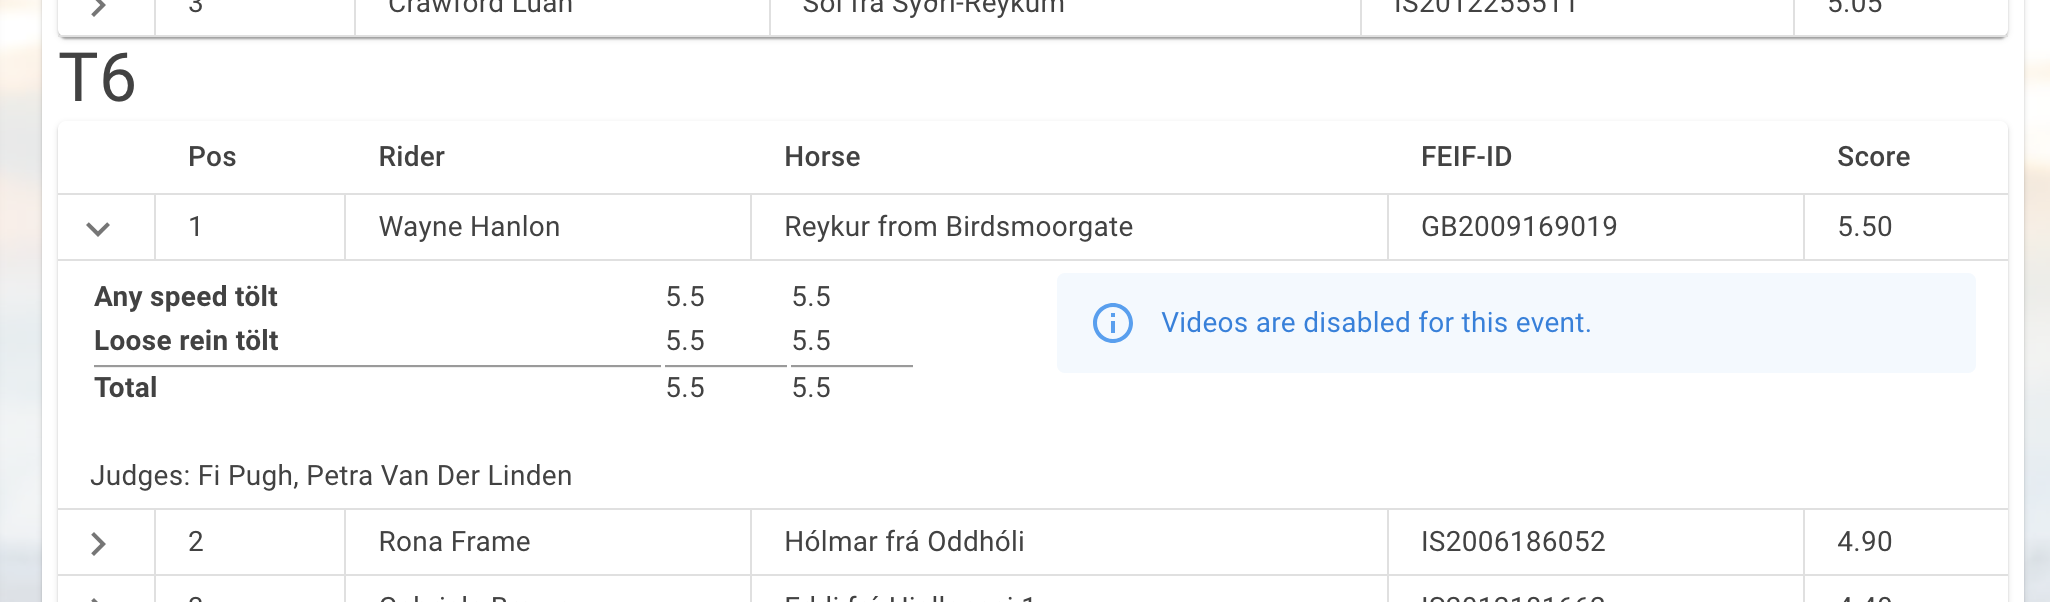 Fig. 30 - Event Results Page
How to Create a Good Video
To get the most out of this service it's really important that your videos are clear and easy for the judge to make their assesment. There are several factors that go into making a good recording. Good lighting, a steady shot, appropriate zoom, etc. The bottom line is that the judges will need a clear uninterrupted video of you riding your test and must be able to see you and your horse in relation to the arena / track at all times.
You can ride your test in a 40×20 or 60×20 arena, a marked-out field, or an oval track. If you are marking out an open space, it should be a minimum of 40×20 with proper corners. For the five-gait tests which include pace, a 60×20 arena or oval track is needed. Please film as clearly as possible from the centre of your chosen location, using the zoom so that the horse and rider are clearly visible in the centre of the picture. Videos must be recorded in a single take, recording the whole test from start to finish in one go. No editing is allowed, other than trimming the start and end of the film. If your video has obviously been spliced together from different shots you will be disqualified with no refund.
Please review your video before submission. Check that the horse and rider are clearly visible throughout the test. Avoid filming dark coloured horses against dark backgrounds, or pale horses against light backgrounds. If using an outdoor location, try to record while the sun is high in the sky, and NOT in front of the camera. Our judges try their best to give accurate feedback but this can be very difficult with poor quality video recordings. We appreciate that not everyone has the ideal setup for making top quality videos but the better the video the more helpful the feedback will be. Judges will be asked to rate the quality of the recording. If your video is of very poor quality a judge may refuse to mark it or give only a low score. There are no refunds if you submit a poor quality video.
If your mobile phone has a high quality camera then by all means your test can be filmed with that device. This gives you the advantage of being able to trim the start and end of the video and upload the video directly to the platform.
Emails from Us
At present, TöltSense Ltd does not send promotional or marketing emails, but we do send transactional email at certain moments. For instance, when you sign in for the first time, you will receive a welcome email. Also, when you complete and pay for an entry you will receive a confirmation email from us and receipt from Stripe. We will develop an email marketing function in time but you will have the ability to opt out of this if you prefer.
Becoming a Judge
In order to operate as a judge in the system you must be granted the appropriate role by an administrator. Please contact us via our facebook page or by direct email to "torben at toltsense dot com"". If we don’t already know you as a judge then please be ready to provide some evidence that you have been appropriately licensed by FEIF or your national organisation.
And Finally..
If you made it this far then well done! Good luck and we look forward to seeing your video.